Whoa!
I've
developed a better method than this.
Read
all about it here.
Improved Method
for
Scanning 35 mm Slides
Scanning slides on a flatbed scanner does not produce the best
possible
images, but it's usually good enough for displaying them on a computer
monitor. After initial disappointment, I worked out the following
method that produces reasonable results with no additional expense,
minimal
equipment, and little fuss. (I've used a Microtek ScanMaker E6
600
dot per inch (optical resolution) flatbed scanner and PhotoImpact, the
software that came with it; but other scanners and software ought to
provide
similar capabilities and results.)
A. PHYSICAL ADJUSTMENTS
-
I remove the scanner's lid. The Microtek E6's lid just pops off
when
you pull the hinged end up gently.
-
On the scanner's glass I place a sheet of black construction paper,
with
a cutout the size of a 35 mm slide holder. This keeps stray light
from influencing the scan, and it also makes it easy to get subsequent
slides in the same place on the glass, saving a little time.
Thicker
paper would work better, but construction paper seems to do fine.
-
I lay a piece of translucent whitish plastic on top of the slide.
This is to diffuse the backlighting that I'll add (in step A3) so the
slide
will be backlit evenly and the scanner won't "see" the
lamp.
The plastic I use is actually part of a slide copying gizmo I've used
for
years on a 35 mm camera. but any relatively thin translucent plastic
ought
to work. The important things are that it transmits light, but
not
the image of the light source, and that its color is neutral, so it
doesn't
affect the color of the image on the slide. Plain white paper
works,
but it isn't uniform in density, so it produces a speckled effect in
the
resulting image, especially in the light areas.
- Then I add light. I've found that a compact fluorescent
desk lamp
works pretty well. The lamp I use has a 13 watt U-shaped
fluorescent
tube about 5.5 inches (14 cm) long, so it concentrates the light nicely
above the slide. It swings out of the way when I want to change
slides,
and the height is easy to adjust. Placing the lamp about 2 or 3
inches
above the translucent plastic usually works well. On very
high resolution scans the fluorescent lamp sometimes induces striation
in the image--narrow horizontal brighter and dimmer stripes, caused, I
think, by a slight phase-shift interference between the two light
sources.
If that's a problem, I've used a photoflood lamp (whiter light than
ordinary
incandescent) or a halogen lamp (only slightly less reddish than
ordinary
incandescent). These lamps get very hot, however, so to avoid
melting
everything, I almost always use the compact fluorescent. I rarely
get striation with Exposure settings between 200 and 500.
(There's
more on exposure in "Scanner Settings," below.)
-
If you'd like to try my earlier method, just place the slide on
the scanner and lay a sheet of white paper on top of it, then close the
lid and follow the "Scanner Settings" instructions, below. This
method
works, but dark areas in the resulting images are about twice
as
dark as in the original slide. That's because the light will have
to pass through them two times--from the scanner's lamp through to the
white paper and then back to the scanner's sensor. Lighter areas
in the slide, on the other hand, allow proportionally more light to
pass
through to the paper and back again. This reduces the range, or
ratio,
of lightness-to-darkness in the scanned image. Adjusting the
brightness
and contrast in software can help with this somewhat, but at the cost
of
reducing the image quality. The improved method supplies at least
as much light from above (behind) the slide as the scanner' lamp
produces,
so the resulting image looks a lot more like the original.
B. SCANNER SETTINGS
The following is specific to Microtek's
ScanWizard,
the Twain-complaint scanner controller that came with the
scanner.
It's likely, however, that other scanners' software provides comparable
features, although they may have different names and be hidden away in
different menus. ScanWizard's View menu contains an item for the
Settings Window, which must be in view because that's where adjustments
to the incoming scan are made. (After the scan,
adjustments
are made in PhotoImpact or some other software designed to enhance or
manipulate
images.)
-
First I reset all of the adjustments to their defaults, and then--this
is the important part--set the Exposure to around 400. Less for
generally light slides, more for very dark slides. If the
backlighting
is very strong, it may not be necessary to increase the
exposure
at all.
-
Then I do a Preview and set the scan area to coincide with the slide
image.
Increasing the exposure above normal dramatically increases the
duration
of the scan, so I usually set the scan resolution to 300 dpi initially,
and then bump it up to 600 or higher when I'm comfortable with any
other
adjustments I'll make.
-
Ideally, the resolution should match the capabilities of the output
device--meaning
that for display on a computer monitor, the scanner's maximum optical
resolution
will probably produce the size image you want from the slide.
I've
found, however, that it's sometimes advantageous to use a higher,
interpolated
resolution because the resulting image is less pixelated. This is
especially useful if I want to display only a small portion of the
slide.
Also, I have a lot of half-frame 35 mm and 16 mm slides taken with a
number
of early pocket-sized cameras (before full-frame 35 mm pocket-sized
cameras
were available). I've gotten reasonable results with these slides
by scanning at 2400 dpi. This doesn't add any more detail,
because
the maximum optical scan is still 600 dpi, but it reduces pixelation
substantially,
so the image usually appears sharper. It's also larger,
of
course--which can be either good or bad, depending on what dimensions
you
need to display. For example, there's no sense in making an
interpolated
4800 dpi scan and then reducing the image to 640 pixels across.
You're
better off scanning at 600 dpi optical. You can see
a few examples of half-frame slides here.
-
I've found that several things affect the color balance in slide
scans.
The color of the backlight is the most significant. One reason I
like the compace fluorescent lamp is that it's closer to natural
daylight
than a standard fluorescent, but still much less red than any
household
incandescent lamp. Sometimes I find it necessary to adjust the
color
balance of an image after scanning, but so far I haven't found
it
useful to mess with the color balance during scanning.
However,
I have often found it helpful to adjust the Shadows and Highlight tool,
in Microtek's ScanWizard, following Wayne
Fulton's instructions. (See an example of mine at D.3.,
below.)
C. EXAMPLES--compare the two
methods
Here are two 300 dpi scans of a rather dark 35 mm slide, first using
the white paper method and second, this improved method. The
difference
in brightness is obvious, but you'll also see that the colors are
different
and the lint is much more obvious in "paper" method . The slide
is
an old one from the 1950s, of farmers planting rice in Korea, and has
deteriorated
quite a lot. Fortunately, it'll be easy to perk up the colors,
now
that the image is scanned.
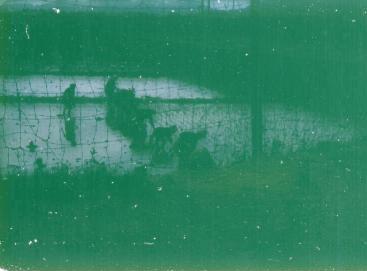
Early "white paper" method (no backlight), 300 dpi, Exposure 600.
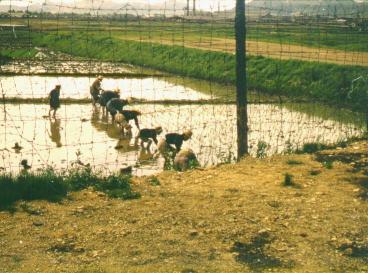
Improved method (compact fluorescent backlight), 300 dpi, Exposure
402.
I chose this particular slide because it's a hard one to work
with.
The shot is badly framed, but the subject may be interesting. If
you'd care to see more detail, here's a slightly enhanced 600
dpi scan of this slide.
D. RELATED PAGES
-
Other comparisons--a "difficult"
slide.
The white paper and the improved methods used on a
slide
of an interior scene with strong lighting contrasts.
-
The same "difficult" slide enhanced in
three different ways.
-
My own experiments with resolution in
scanning
slides. The "difficult" slide scanned at resolutions varying
from 300 to 4800 dpi, using the "white paper" method.
-
Be sure to see Wayne
Fulton's
excellent adviceon improving the quality of
scans.
That's his main page. He has specific
info on scanning slides here.
Scanning Index.
My home page.
Send me email

(Please type it into the "To:" box in an email message.)
Don Maxwell